Manage timestamps
Overview
When a mobile user progresses a job on their mobile device, a timestamp is recorded against each status change, and it is stored as a record of when that transition (or state transition) occurred.
In certain situations, the user might make a state transition earlier or later than they planned. Some examples of this would be by accidentally pressing an action button, accidentally pressing a button too quickly (or not at all), or not being able to press a button due to connection difficulties.
The ability to manage times is enabled (by default) using the admin setting Allow resources to change the job status timestamps. This allows users to change the time and date of their job allocation transitions.
Manage times using Skedulo
The following job transition times can be altered once they have been recorded (i.e., the job allocation state has been passed and time-stamped):
-
Start Travel.
-
Check-in.
-
In Progress.
-
Complete.
The benefit of this (default) behavior is that it enables mobile users to manage times and account for their mistakes–for more accurate reporting, or for adjusting times where charging may be based on fixed intervals.
Some organizations though require a locked-down audit trail for job status transitions and require a supervisor’s approval for any edits to transition times. So, there is a web app admin setting to control whether or not the job status timestamps can be changed.
How to manage times on Skedulo
To manage times (or dates) within Skedulo complete the following steps:
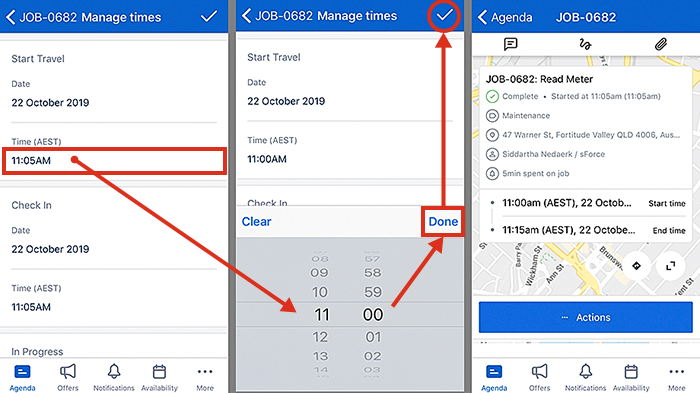
- After a job has been accepted and progressed to a state of In Progress or Complete, tap on the Actions button.
-
Select Manage Times option from the Actions menu.
-
Identify and tap on the time that needs to be adjusted.
-
Using the date and time pickers, adjust the time as required.
-
Tap on the large check (tick) button (top right) to save the new time setting(s).
The adjusted time will now be displayed in the job’s details.
These time settings can be adjusted at any point by just reopening the job and tapping on the actions button.

Note
The feature Manage Times is enabled by default.
You can disable this option from the Skedulo web app by clicking on your Profile -> Setting and selecting Workflow from the left panel. In the workflow screen, select Jobs tab, and under the Job status section, unselect the Allow resources to change the job status timestamps to disable it.
If a custom job workflow has been applied, those job allocation states that are skipped will not be available to manage (with respect to their times), e.g., If “Start Travel” is skipped, it will not appear in the managed times view.
Related links
Feedback
Was this page helpful?